Create .NET 6/7/8 Azure Function App with Dependency Injection and the Key Vault as Configuration Provider
Last update: Januari 3, 2024
Source code in Git: Azure Function App Example
Creating a basic Azure Function App is simple, but when you have to build a professional Function App it is not always easy to find the right instructions and documentation.
In this article I will show all tasks involved to create a professional .NET Core Azure Function App, compact and step-by-step.
This article is also intended as a reference source.
I will use the Azure.Identity library, which makes it very easy to use the Azure KeyVault as a Configuration Provider.
REMARKS:
In this article I describe the .NET Isolated version of the Azure Function App. With the non-isolated version you are tightly bound to the .NET version and you are in trouble when you upgrade your libraries to another .NET version (your function app can’t use them anymore). See also: Guide for running C# Azure Functions in an isolated worker process
Your Function App needs an Azure Storage Account. You can store the connection string for the storage credentials in the KeyVault as a secret named AzureWebJobsStorage as described below. Unfortunately, when you test local, the Function App does NOT read AzureWebJobsStorage from the configuration/KeyVault, but requires it to be stored in local.settings.json. To prevent storing keys on your local computer, you can set AzureWebJobsStorage to "UseDevelopmentStorage=true" in local.settings.json.
Table of contents
- Create and configure resources in the Azure Portal
- Create the Function App Solution
- Create a new Function App Solution in Visual Studio
- Update Program class with the KeyVault as a configuration provider
- Add a service: DemoService.cs
- Add a HttpTrigger Function with dependency injection: IsAliveFunction.cs
- Add a TimerTrigger Function with dependency injection: TimerTriggerFunction.cs
- Local testing/debugging in Visual Studio
- Publish to Azure
- References
Create and configure resources in the Azure Portal
Create a Key Vault
- Use a single Key Vault for every app group (a group may consist of, for example: Function Apps, Api, WebApp, Mobile and tools).
- You can use different Key Vaults for Development/Staging and Production if you want.
- Create a Key Vault in the Azure Portal (search for Key vaults)
- Make sure to select the correct Subscription, Resource group, Region, Pricing tier (Standard).
- In the Access configuration tab, make sure Azure role-based access control is selected.
Create a (Blob) Storage Account
- Create a Storage Account in the Azure Portal (search for Storage accounts)
- Make sure to select the correct Subscription, Resource group and Region. Set a Storage account name (lowercase only), Performance (Standard), Redundancy (LRS or GRS).
- In the Advanced tab Check the Security settings.
- In the Data protection tab check the Recovery and Tracking options.
- Select Review + create, verify the selected settings and select Create.
- Wait until Your deployment is complete is shown, then select Go to resource.
- In the Storage account left menu select Access keys. Copy the (key 1) Connection string (the connection string includes the key). Will be used in the section Add secrets (configuration values) to the Key Vault below.
Create a Function App
- Create a Function App in the Azure Portal (search for Function App)
- Make sure to select the correct values for Subscription, Resource group, deploy method (Code), Runtime stack (.NET), Version (6/7 or 8 Isolated) and Region.
- Choose Operating System and at Hosting select your plan (Consumption (Serverless)).
- Press Next: Storage and select the Storage account you created above. You can also choose to configure diagnostics.
- In the Monitoring tab: If you want to, enable Application Insights and select the correct one (or create a new one).
- Select Review + create, verify the selected settings and select Create.
- Wait until Your deployment is complete is shown, then select Go to resource.
- Select Configuration in the left menu.
- Azure added the settings AzureWebJobsStorage and WEBSITE_CONTENTAZUREFILECONNECTIONSTRING with the Storage Connection string we added to the key vault. Replace them to read from the KeyVault:
- Add a new application setting WEBSITE_SKIP_CONTENTSHARE_VALIDATION with the value 1 (to prevent Azure to validate the new value for WEBSITE_CONTENTAZUREFILECONNECTIONSTRING below).
- Change the value of AzureWebJobsStorage with: @Microsoft.KeyVault(VaultName=–your-key-vault-name–;SecretName=AzureWebJobsStorage)
- Change the value of WEBSITE_CONTENTAZUREFILECONNECTIONSTRING with: @Microsoft.KeyVault(VaultName=–your-key-vault-name–;SecretName=AzureWebJobsStorage). SecretName is here ALSO AzureWebJobsStorage, because this setting needs the same Storage Connection string.
- See for explanation Use Key Vault references as app settings in Azure App Service and Azure Functions
- For the Function Example App add some test application settings:
- New application setting: TestSetting3, Value: TestSetting3 from function app configuration
- New application setting: TestSetting4, Value: TestSetting4 from function app configuration
- Click the Save button above to save the new and changed settings.
- See also App settings reference for Azure Functions
Enable access of your Function App and yourself to the KeyVault
- Select Identity in the left menu of your Function App, turn on Status on the System assigned tab and press Save > Yes.
- Wait until Save is ready.
- Go back to the Key Vault you created above.
- Select Access control (IAM) in the left menu.
- Select Add role assignment
- Select role Key Vault Secret User
- Press Next (Members tab) and select at Assign access to Managed identity
- Press +Select members, choose your subscription and at Managed identity select Function App. Now you can choose your app from the list.
- Press the Select button and save with Review + assign.
- Your Function App can now read configuration values from the KeyVault.
- Now add yourself:
- Select Add role assignment
- Select role Key Vault Administrator
- Press Next (Members tab) and select at Assign access to User, group, or service principal
- Press +Select members, and choose your account.
- Press the Select button and save with Review + assign.
Add secrets (configuration values) to the Key Vault
- Select Secrets in the left menu.
- Select + Generate/Import.
- Set Name to AzureWebJobsStorage and in Value paste the Storage Connection string you saved from the storage account.
- For the Function Example App add some more secrets:
- Name: DbCredentials–UserId, Value: UserId read from the KeyVault
- Name: TestSecret, Value: Test Secret stored in the KeyVault
- Name: TestSetting3, Value: TestSetting3 stored in the KeyVault
- Name: TestSetting4, Value: TestSetting4 stored in the KeyVault. Open TestSetting4 => Open the current value => Set Enabled to No.
Create the Function App Solution
Create a new Function App Solution in Visual Studio
REMARK: The latest toolsets for functions might not yet be installed. Go to Tools -> Options -> Projects and Solutions -> Azure functions. Click “Check for updates” button. If there are updates, click “Download & Install” (source: Running Azure functions locally gives “No runtime” error after .NET7 upgrade)
- In Visual Studio select Create a new project or File > New > Project….
- Select the Azure Functions template and click Next.
- Set your Project name, Location and Solution name and click Next
- At Functions worker select .NET 8.0 Isolated. If this option is not available, see REMARK above. If you need another .NET version, make sure to select the Isolated version: with the non-isolated version you are tightly bound to the .NET version and you are in trouble when you upgrade your libraries to another .NET version.
- At Function select Timer trigger.
- Make sure Use Azurite for runtime storage account is selected. This way, the Azurite emulator is used for the timer storage when you test locally. We will setup the function App to read the Storage account connection string from the KeyVault when the App is in production (running on Azure).
The generated solution contains a .gitignore file to prevent local.settings.json is stored in your git-repo. This is important when you add secrets to your local.settings.json. Never store secrets in a git repository! You will not be able to remove them ever!. But I advise not to store secrets in local.settings.json because you might want the local.settings.json in git. Otherwise your colleague (or you on another machine) will have trouble with local testing because the setting for the storage emulator is missing. Later in this article I will show how to use your Microsoft account and the UserSecrets section to use secrets locally in your configuration.
Update Program class with the KeyVault as a configuration provider
- Add Nuget packages:
- Azure.Extensions.AspNetCore.Configuration.Secrets
- Azure.Identity
- Microsoft.Azure.Functions.Worker
- Microsoft.Azure.Functions.Worker.Extensions.Http
- Microsoft.Azure.Functions.Worker.Extensions.Timer
- Microsoft.Azure.Functions.Worker.Sdk
- Microsoft.Extensions.Hosting
- Microsoft.NETCore.Platforms
- Add an appsettings.json file:
{ "KeyVaultName": "--your-key-vault-name--" }- In source example code: add some test settings to show the priority in the configuration providers
- Select the appsettings.json file in Solution Explorer and in the Properties at Copy to Output Directory select Copy if newer. (Keep Build Action: None).
- You can also add
appsettings.Development.jsonwith development specific settings andappsettings.Production.jsonwith production specific settings. If you use different key vaults for development and production, move the KeyVaultName setting to these files.
- When running/debugging locally, environment defaults to Development. If you want to test with another configuration (like Production or Staging), you can add the AZURE_FUNCTIONS_ENVIRONMENT variable. You can do this in the file Properties/launchSettings.json like this:
{ "profiles": { "FunctionWithKeyVaultAndDI": { "environmentVariables": { "AZURE_FUNCTIONS_ENVIRONMENT": "Production" }, "commandName": "Project", "commandLineArgs": "--port 7150", "launchBrowser": false } } } - Add a static class ConfigurationKeys.cs:
namespace Forestbrook.FunctionWithKeyVaultAndDI; public static class ConfigurationKeys { public const string AzureFunctionsEnvironment = "AZURE_FUNCTIONS_ENVIRONMENT"; /// <summary> /// StorageConnectionString for Azure Function /// </summary> public const string AzureWebJobsStorage = "AzureWebJobsStorage"; public const string DatabaseUserId = "DbCredentials:UserId"; public const string KeyVaultName = "KeyVaultName"; public const string KeyVaultTenantId = "KeyVaultTenantId"; } - Add the static helper class FunctionHelper.cs:
using Azure.Core; using Azure.Identity; using Microsoft.Extensions.Configuration; using Microsoft.Extensions.Hosting; using System; namespace Forestbrook.FunctionWithKeyVaultAndDI; public static class FunctionHelper { public static IConfigurationBuilder AddAppSettingsJson(this IConfigurationBuilder builder, HostBuilderContext hostingContext) { // REMARKS: // hostingContext.HostingEnvironment.EnvironmentName defaults to Production, but when local.settings.json is loaded, it defaults to Development. // To change the default, set the environment variable AZURE_FUNCTIONS_ENVIRONMENT. // For local testing, you can set AZURE_FUNCTIONS_ENVIRONMENT in Properties/launchSettings.json: // e.g.: "environmentVariables": { "AZURE_FUNCTIONS_ENVIRONMENT": "Staging" }, var environmentName = hostingContext.HostingEnvironment.EnvironmentName; builder.AddJsonFile("appsettings.json", optional: true, reloadOnChange: false); builder.AddJsonFile($"appsettings.{environmentName}.json", optional: true, reloadOnChange: false); return builder; } /// <summary> /// Make sure to add to your appsettings.json: "KeyVaultName": "your-key-vault-name" /// </summary> public static IConfigurationBuilder AddAzureKeyVault(this IConfigurationBuilder builder) { var configuration = builder.Build(); var keyVaultUri = configuration.CreateKeyVaultUri(); var keyVaultCredential = configuration.CreateKeyVaultCredential(); return builder.AddAzureKeyVault(keyVaultUri, keyVaultCredential); } private static TokenCredential CreateKeyVaultCredential(this IConfiguration configuration) { // WARNING: Make sure to give the App in the Azure Portal access to the KeyVault. // In the Identity tab: System Assigned part: turn Status On. // In the KeyVault: Access control (IAM) > Add role assignment > Select role: Key Vault Secret User => Members tab: Assign access to: Managed identity and with +Select members select your functions app. // When running on Azure, you do NOT need to set the KeyVaultTenantId. var keyVaultTenantId = configuration[ConfigurationKeys.KeyVaultTenantId]; if (string.IsNullOrEmpty(keyVaultTenantId)) return new DefaultAzureCredential(); // When debugging local from VisualStudio AND the TenantId differs from default AZURE_TENANT_ID (in Windows settings/environment variables), // you can store KeyVaultTenantId= in appsettings or in UserSecrets and read it here from the configuration (as done above) // See also: https://www.forestbrook.net/docs/azure/functionwithkeyvaultanddi.html#local-testingdebugging-in-visual-studio var options = new DefaultAzureCredentialOptions { VisualStudioTenantId = keyVaultTenantId }; return new DefaultAzureCredential(options); } private static Uri CreateKeyVaultUri(this IConfiguration configuration) { if (configuration == null) throw new ArgumentNullException(nameof(configuration)); var keyVaultName = configuration[ConfigurationKeys.KeyVaultName]; if (string.IsNullOrEmpty(keyVaultName)) throw new InvalidOperationException($"Missing configuration setting {ConfigurationKeys.KeyVaultName}"); return new Uri($"https://{keyVaultName}.vault.azure.net/"); } } - Change the Program.cs class
using Microsoft.Extensions.Configuration;
using Microsoft.Extensions.DependencyInjection;
using Microsoft.Extensions.Hosting;
using System.Threading.Tasks;

namespace Forestbrook.FunctionWithKeyVaultAndDI;

internal class Program
{
    static async Task Main(string[] args)
    {
        var host = new HostBuilder()
            .ConfigureFunctionsWorkerDefaults()
            .ConfigureAppConfiguration(ConfigureAppConfiguration)
            .ConfigureServices(Configure)
            .Build();

        await host.RunAsync();
    }

    private static void Configure(HostBuilderContext context, IServiceCollection services)
    {
        // Configure your services here:
        services.AddSingleton<DemoService>();
    }

    private static void ConfigureAppConfiguration(HostBuilderContext hostingContext, IConfigurationBuilder appConfigBuilder)
    {
        // When running/debugging locally, local.settings.json is automatically loaded
        // Environment defaults to Development
        // To change the environment set it in Properties/launchSettings.json: "environmentVariables": { "AZURE_FUNCTIONS_ENVIRONMENT": "Staging" },

        // When running on Azure, values defined in your Function App section Configuration => Application Settings are loaded as Environment Variables.
        // Environment defaults to Production
        // To change the environment set it with AZURE_FUNCTIONS_ENVIRONMENT in Application Settings

        // See also: Manage your function app: https://learn.microsoft.com/en-us/azure/azure-functions/functions-how-to-use-azure-function-app-settings
        // All possible settings see App settings reference for Azure Functions: https://learn.microsoft.com/en-us/azure/azure-functions/functions-app-settings

        appConfigBuilder.AddAppSettingsJson(hostingContext);
        appConfigBuilder.AddEnvironmentVariables();
        appConfigBuilder.AddUserSecrets<Program>(optional: true);
        appConfigBuilder.AddAzureKeyVault();
    }
}
Add a service: DemoService.cs
using Microsoft.Extensions.Configuration;
using System;

namespace Forestbrook.FunctionWithKeyVaultAndDI;

public class DemoService
{
    public DemoService(IConfiguration configuration)
    {
        if (configuration == null) throw new ArgumentNullException(nameof(configuration));

        // Get test secrets from the KeyVault:
        UserId = configuration[ConfigurationKeys.DatabaseUserId];
        TestSecret = configuration["TestSecret"];
    }

    public string TestSecret { get; }

    public string UserId { get; }
}
In the Configure method in Program.cs above the DemoService was already added:
services.AddSingleton<DemoService>();
See Service lifetimes to figure out when to use Singleton, Transient or Scoped.
Add a HttpTrigger Function with dependency injection: IsAliveFunction.cs
- Remove the Function1 class
- Mind that the Run function can be
async Taskif you need to call Async methods.
using Microsoft.Azure.Functions.Worker;
using Microsoft.Azure.Functions.Worker.Http;
using Microsoft.Extensions.Configuration;
using Microsoft.Extensions.Hosting;
using Microsoft.Extensions.Logging;
using System;
using System.Net;
using System.Text;
using System.Threading.Tasks;

namespace Forestbrook.FunctionWithKeyVaultAndDI;

public class IsAliveFunction
{
    // Test local: http://localhost:7150/api/IsAliveFunction?TestQuery=TestQueryValue (port specified in Properties/launchSettings.json).
    // Test on Azure: https://TODO-your-function-name-.azurewebsites.net/api/IsAliveFunction?TestQuery=TestQueryValue
    private const string IsRunningMessage = "Forestbrook Function is running. Version:";
    private readonly IConfiguration _configuration;
    private readonly IHostEnvironment _hostEnvironment;
    private readonly ILogger _logger;

    public IsAliveFunction(IConfiguration configuration, IHostEnvironment hostEnvironment, ILoggerFactory loggerFactory)
    {
        ArgumentNullException.ThrowIfNull(loggerFactory);
        _configuration = configuration ?? throw new ArgumentNullException(nameof(configuration));
        _hostEnvironment = hostEnvironment ?? throw new ArgumentNullException(nameof(hostEnvironment));
        _logger = loggerFactory.CreateLogger<IsAliveFunction>();
    }

    [Function(nameof(IsAliveFunction))]
    public async Task<HttpResponseData> Run([HttpTrigger(AuthorizationLevel.Anonymous, "get", "post")] HttpRequestData req)
    {
        _logger.LogInformation($"C# HTTP trigger function {nameof(IsAliveFunction)} is processing a request.");

        // Execute async tasks:
        await Task.CompletedTask;

        var version = typeof(Program).Assembly.GetName().Version?.ToString(3);
        var sb = new StringBuilder($"{DateTime.Now:d-M-yyyy H:mm:ss} - {IsRunningMessage} {version}<br/>");
        sb.Append("<br/>");
        sb.Append($"EnvironmentName = {_hostEnvironment.EnvironmentName}<br/>");
        sb.Append($"IsDevelopment: {_hostEnvironment.IsDevelopment()}<br/>");
        sb.Append($"IsProduction: {_hostEnvironment.IsProduction()}<br/>");
        sb.Append($"ApplicationName = {_hostEnvironment.ApplicationName}<br/>");
        sb.Append($"ContentRootPath = {_hostEnvironment.ContentRootPath}<br/>");
        sb.Append("<br/>");
        sb.Append("<b>Test settings to show the priority in the configuration providers:</b><br/>");
        sb.Append($"TestSetting1 = {_configuration["TestSetting1"]}<br/>");
        sb.Append($"TestSetting2 = {_configuration["TestSetting2"]}<br/>");
        sb.Append($"TestSetting3 = {_configuration["TestSetting3"]}<br/>");
        sb.Append($"TestSetting4 = {_configuration["TestSetting4"]}<br/>");
        sb.Append("<br/>");
        if (req.Query.AllKeys.Length > 0)
        {
            sb.Append("QUERY VALUES:<br/>");
            foreach (var key in req.Query.AllKeys)
                sb.Append($"{key} = {req.Query[key]}<br/>");
        }

        // Show we're alive:
        var response = req.CreateResponse(HttpStatusCode.OK);
        response.Headers.Add("Content-Type", "text/html; charset=utf-8");
        response.WriteString(sb.ToString());
        return response;
    }
}
Add a TimerTrigger Function with dependency injection: TimerTriggerFunction.cs
using Microsoft.Azure.Functions.Worker;
using Microsoft.Extensions.Logging;
using System;
using System.Text;
using System.Threading.Tasks;

namespace Forestbrook.FunctionWithKeyVaultAndDI;

public class TimerTriggerFunction
{
    private const string TimerSchedule = "0 */5 * * * *"; // Every 5 minutes
    private readonly DemoService _demoService;
    private readonly ILogger _logger;

    public TimerTriggerFunction(DemoService demoService, ILoggerFactory loggerFactory)
    {
        ArgumentNullException.ThrowIfNull(loggerFactory);
        _demoService = demoService ?? throw new ArgumentNullException(nameof(demoService));
        _logger = loggerFactory.CreateLogger<TimerTriggerFunction>();
    }

    [Function(nameof(TimerTriggerFunction))]
    public Task Run([TimerTrigger(TimerSchedule)] TimerInfo timerInfo)
    {
        var sb = new StringBuilder();
        sb.AppendLine("-----------------------------------------------");
        sb.AppendLine($"C# Timer trigger function executed at: {DateTime.Now}. IsPastDue: {timerInfo.IsPastDue}");
        sb.AppendLine($"Next timer schedule at: {timerInfo.ScheduleStatus?.Next}");
        sb.AppendLine($"UserId: {_demoService.UserId}");
        sb.AppendLine($"TestSecret: {_demoService.TestSecret}");
        sb.AppendLine("-----------------------------------------------");
        _logger.LogInformation(sb.ToString());

        // Short delay to prevent completion to mess up with the logging output.
        return Task.Delay(100);
    }
}
Local testing/debugging in Visual Studio
When you run the Function App from Visual Studio on your local computer for debugging, the Function App can magically connect to the KeyVault. This magic happens in the DefaultAzureCredential() which was connected to the KeyVault Secrets configuration provider added in Startup.
See Authenticate via Visual Studio
To make this work, your Microsoft Account must have at least Get and List access to the KeyVault or has the Key Vault Secret User role. See description above in the section Enable access of your Function App and yourself to the KeyVault.
Issues
-
Unfortunately, when you test local, the Function App does NOT read AzureWebJobsStorage from the configuration/KeyVault, but requires it to be stored in
local.settings.json. To prevent storing keys on your local computer, you can set AzureWebJobsStorage to"UseDevelopmentStorage=true"in local.settings.json. -
You might have to tell Visual Studio your Azure tennant ID by setting the environment variable AZURE_TENANT_ID.
Here is were you can find your Azure tennant ID:
- Go to the Azure Portal
- When necessary, switch to the Active Directory with the KeyVault.
- Search for and select Tenant properties
- Copy the Tenant ID.
To set the environment variables on your PC:
- In File Explorer right click This PC
- Select Properties
- Click Change Settings
- Click the Advanced tab
- Click Environment variables….
Remember to restart Visual Studio after setting the environment variables.
-
If you have solutions for more than one Azure tennant, it is quite annoying to change the AZURE_TENANT_ID environment variable. That is why I added the ConfigurationKey KeyVaultTenantId. You can store the KeyVaultTenantId=–your-tennant–id– in UserSecrets (in Visual Studio right-click your Function App Project and choose Manage User Secrets) or in appsettings.Development.json.
- If you have multiple Microsoft accounts connected to Visual Studio, you might have to tell Visual Studio which account to use:
- Select Tools > Options…
- Go to option Azure Service Authentication > Account Selection
- Choose an account.
- Alternatively, you can set the environment variable AZURE_USERNAME
- If your account is not configured correctly, you will get an
Azure.Identity.AuthenticationFailedException.
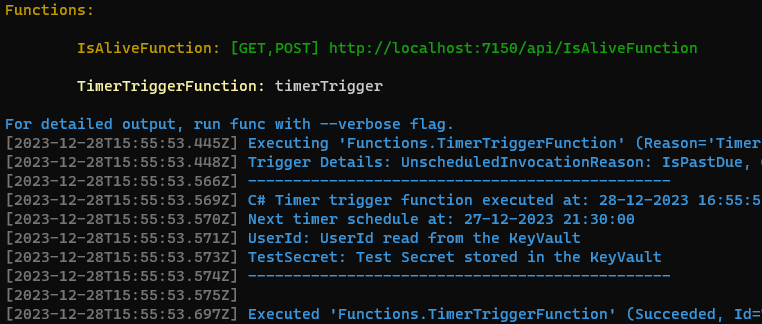
Run the Function App
Publish to Azure
- In Visual Studio right click your Function App Project and choose Publish…
- Select target Azure and click Next.
- Select Specific target Azure Function App
- In the Publish window, make sure to select the right Microsoft account and Subscription name, select the Function App you created and select Run from package file. Click Finish.
- Click Publish. This will build the Release version of you App and publish it to your Azure Function App.
References
- Source code in Git: Azure Function App with KeyVault and DI
- Guide for running C# Azure Functions in an isolated worker process
- Use Key Vault references as app settings in Azure App Service and Azure Functions
- Dependency injection in Azure Functions in an isolated worker process
- App settings reference for Azure Functions
- Authenticate via Visual Studio